#VAin30 - Day 12: Building a Facebook Page
You've already got your website, and that should be your "home base" for your business. But let's be honest: people want to see their favorite brands and businesses on Facebook. It's an easy way to advertise, and it gives people a chance to contact you more easily.
If you don't already have a Facebook page for your VA business, set aside 3 hours to do that right now. It's easy, if you take these simple steps:
1. Create your page.
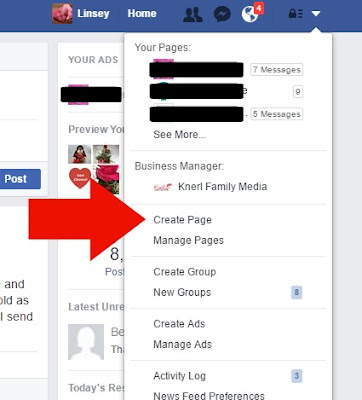
Make sure you are logged into the Facebook account that you want to own the new business page. Then, it is as simple as choosing the drop down arrow on the far right side (next to your notifications) and scrolling down. Click "Create page."
2. Pick your business type.
If you plan on doing a lot of local business and want people to be able to find you by your address, or see you in person, pick the "Local Business or Place" option. (This will allow people to "check in".) Otherwise, most VA's go with the "Company, organization, or Institution" option.
3. Fill in your business details.
It's important to have your page completed before promoting. Things to remember to include are:
- Contact email
- Phone (if applicable)
- Website URL
- Description
- Mission
- Username - This is VERY important. Establish this as an easy phrase that matches your name. This is what people will type into Facebook to find your page, if they don't have the direct URL. If you find that the user name you want is taken, be creative, but don't stray from your message. For example, if "NebraskaVA" is taken, try "NebVA" or "NebraskaVirtual".
4. Add Photos/graphics
You'll be asked to put in two graphics, much like on your personal Facebook page. One should be a perfect square, and it will be your profile pic. If you have a logo, this would be most appropriate. If your photo looks skewed or doesn't fit perfectly inside the box, try using a product like PicMonkey to edit. I take my rectangle logo, paste it onto a white canvas, and crop it to be perfectly square.
(Picmonkey also has a very handy template generator that will automatically size your canvas to be optimized for each social media channel. To use this feature, you'll need to select "Design" from the Picmonkey home page. Then, choose "Blank Canvas". The sizes for each social channel will pop up.)
Your Cover photo should be something that represents your business, but it should also be professional. If you feel that you will be using a lot of graphics for your social media updates or client projects, consider getting a Graphicstock subscription for unlimited royalty-free photos for a year. I like to change out my Cover photo once a month or so.
5. Remove unnecessary tabs.
While you may, sometime in the future, hold a sweepstakes, it's not likely you will for some time. Now is a good time to get rid of any tabs in your navigation bar (on the left) that distract and don't offer your visitors anything. Tabs that you may want to get rid of -- for now -- include Sweepstakes, Events, Offers, and possibly the Shop section.
You can do this by clicking the "Manage Tabs" tab at the bottom of your navigation bar. You'll be directed to a page in your settings where you can choose default tabs (not recommended) or to customize each tab to be "On/Off" and additional details. Go through each tab one by one, and make sure only the ones you will use are ON. Save before you exit. (You can always change your mind about a tab showing later.)
6. Sign Up Button Edits
There is a Sign Up button on Facebook that you can customize to get more visitors to your website or on your email list. Unless you already have an email subscription service (we will cover that later), you can skip this for now. You can also choose to Edit the button to have it go to your website's contact form.
Now that you page is ready, you can "View as Page Visitor" by clicking the "More" button directly under your Cover photo. This will show you exactly how it will look to people, and you can make edits as needed.
(Remember, that anytime you are logged into Facebook, visiting your page may automatically switch you over to your page admin role. If you want to comment or share, be certain you are switching to your personal account first. You can do this by clicking on the small icon of your page under any comment or post and allowing the drop-down to show your personal icon. Click this to switch back and forth.)
That's it! Your page is set up. You're now ready to use it to promote your business and provide excellent customer service. You'll also be able to help future clients set up their own Facebook pages, too!
Sign up for the mailing list to be reminded of each's day's new step in the journey to starting a successful virtual assistant business! I can't wait to do this with you! Need to catch up? Start with Day One here.


No comments: